
Interior Design – Why you need to appreciate it! – Part Two
In part 1 of this article, Clara tells us how her love for architecture was born. She also explains the close relationship that architects share with interior designers.
In this part of the article, Clara explains what she went through to finish her client’s assignment and the lessons that she learnt along the way.
…..
Part C – Colour and material selection
When I had finished with the interior design and placement of the various components, it was now time for me to play around with a number of colour options. Personally, I have a thing for quiet colours and I like to use them in monochromatic schemes (different shades of the same colour). The client on the other hand was very quick to point out that the colour schemes I was proposing for the spaces were too dull for his liking.
Colour selection in the beginning was quite difficult for me because of my own personal preferences versus the client’s own preferences. However, he quickened the process when he shared the colours he had in mind when envisioning his house. As the assignment progressed, I appreciated his choice of colours (bright colours) and how they could work together even when being so dissimilar.
In dealing with the various bright colour combinations at my disposal, I introduced transition colours for overlapping spaces like the kitchen and lounge, the lounge and staircase, the staircase and family room. Where the strength of the individual colours was causing some visual conflict, the transition colour was a softer colour that worked with either one of the brighter colours; creating a sort of interface over which the two colours worked with each other more smoothly.
Part D – Preparation of detailed construction drawings
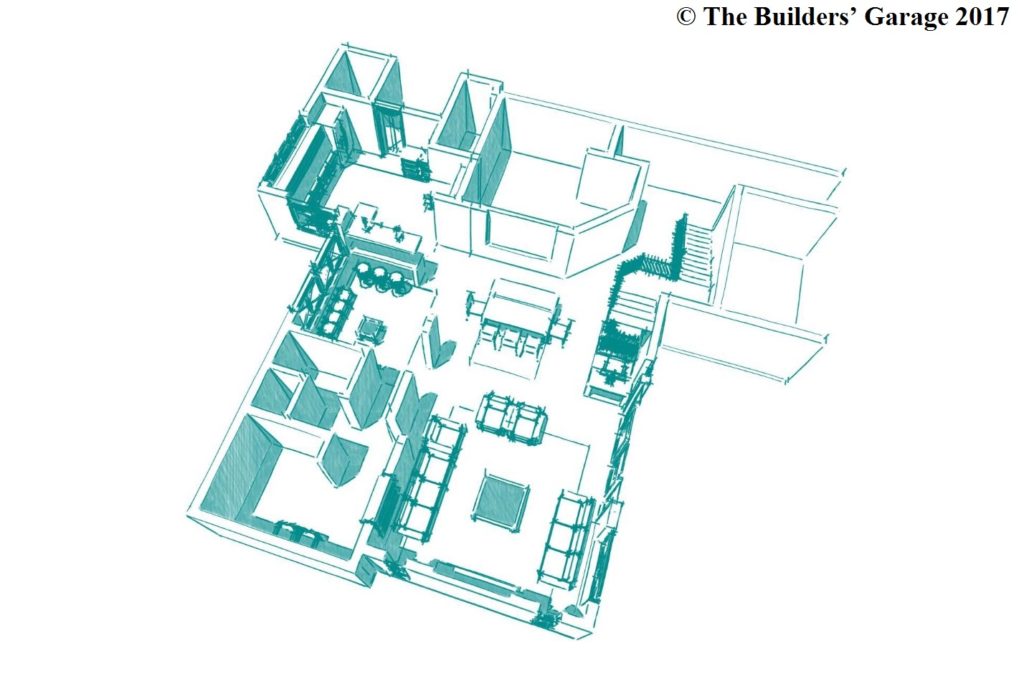
The 3D images that I produced as part of my interior design assignment were further explained in the form of detailed construction drawings. Construction drawings are a crucial form of communication between the designer and builder that enable the builder to carefully and skillfully take into consideration all the interior design detail that has been prepared as he goes about constructing the image that has been agreed upon between designer and client.
I was therefore required to prepare detailed construction drawings for each space. This was a lot of work and yet at the start of this assignment I had not correctly estimated just how much work this would be. Some of the things I needed to clearly indicate in my detailed construction drawings were;
- The locations for sockets and switches (distance from corners and height above finished floor level)
- The size, position and depth of ceiling recesses
- Heights, length, depth and thickness of kitchen tops and all reinforced concrete structures.
- The design and positioning of all custom timber components in the kitchen and lounge, materials and the quantities of each.
- Lighting positions.
- Construction of custom furniture.
- Staircase balustrade design and fixing, tread and riser design, skylight construction, bathroom tiling and fixture positions, to mention but a few.
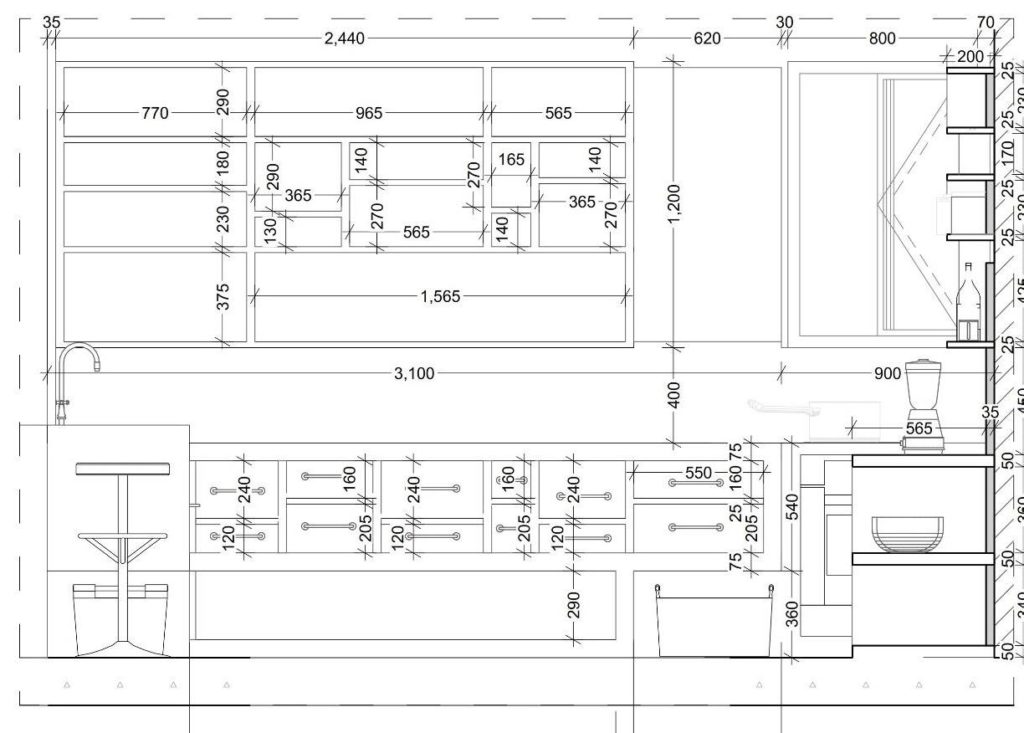
Figure 9: Detailed drawings for the kitchen space – showing timber cabinets and shelves
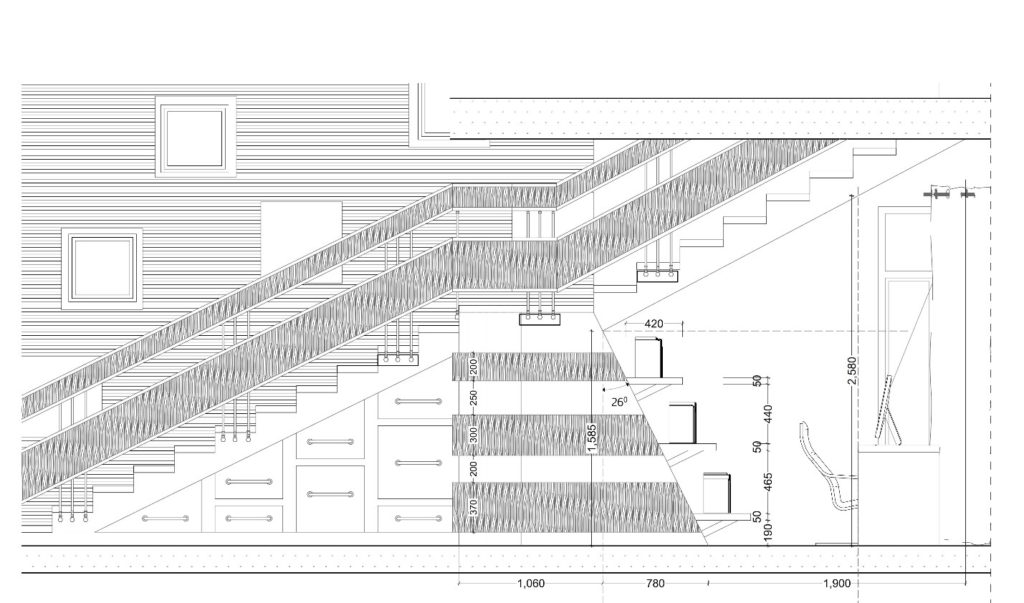
Figure 10: Construction detail for staircase workspace
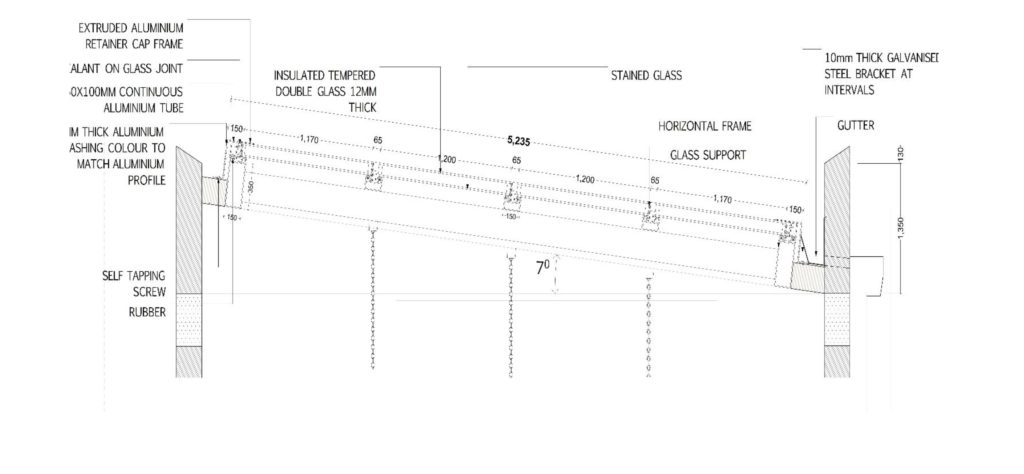
Figure 11: Detailed construction drawings for the skylight
The detailed construction drawings for the skylight had its own cocktail of challenges
Apart from determining and agreeing with the client on which section of the roof to insert a skylight, I designed the structure to perform a functional and decorative function while staying economical. I also had to ensure that it was structurally strong (sufficiently supported), and sensitive to the tropical climate in that, as earlier mentioned, it would let in light, but a minimum amount of heat. For this to be achieved, very precise specifications had to be given for construction indicating material, sizes, fixing, spacing of the two glass layers, to mention but a few.

Figure 12: Additional detailed drawing for skylight

Figure 13: 3D impression of the skylight above the staircase
Part E – My input to the design of an appropriate electromechanical system
My choice of lighting design
The client informed me that he did not fancy chandeliers so I immediately excluded them from my choice of lighting methods.
For the lounge and dining which most commonly get chandeliers as outstanding ceiling centerpieces, I decided to have the lighting take the background role instead and put emphasis on the ground objects and activities going on in the space. I designed recessed lights for the ceiling which were located within the recessed parts of the ceiling.
In the kitchen, I designed the lights based on the character of the repetitive nature of the things in the kitchen, like cups, plates and glasses. I then used a simple arrangement of identical ceiling lamps running across the ceiling like glasses hanging upside-down from a rack.
Above the stairwell, I had designed a skylight for both natural lighting and for the visual pleasure of watching the sky from the indoors. This view of the sky includes being able to see the solar bodies like the sun, moon and stars. I designed for lights that imitate the character of these bodies. I used ceiling lamps suspended from long thin chains to create the impression that the lights are suspended in the space above the stairs.
Location of lighting points
For the lounge, I used the central position along the axis of the room. I avoided using peripheral lighting because with recessed ceiling lights I was likely to need more lights to evenly distribute the light around the room.
In the kitchen, the lighting position was dictated by the need to soften the effects of a beam that run across the ceiling. A false beam had been introduced and a ribbed ceiling pattern created between the two beams. The lights were placed along these ribs to give the ceiling design both aesthetic and functional value.
The three lamps over the stairwell are located along the middle rib of the skylight. This rib is slanted at the angle of the roof, which gives the individual lamps different heights even though their chains are of the same length. The different heights also seek to subtly resemble the heavenly bodies, which are not equidistant from the earth.
Challenges and lessons learnt
-
Price Negotiation – Before you set a price for this kind of assignment or any other similar assignment, you need to spend a considerable amount of time listening to the requirements of the client. Once you are completely certain about the client’s requirements, you should be able to provide a competitive quote for your services. When I completed the client’s assignment, I realised that I had grossly underquoted for my services and I will never make the same mistake again. I have also learnt that it is better for the client to make you an offer before you begin to negotiate price. In most cases, that the first person to state a price loses negotiating power.
-
Working with other professionals – In arriving at the final construction detail, I had to work with a mechanical and electrical engineer who was assigned the role of developing appropriate mechanical and electrical drawings. I checked his final submissions for consistency with the original architectural drawings and my interior design. Working together with the mechanical and electrical engineer reinforced the fact that projects are not a one-man show. You need to work with other professionals. When you work in isolation, you might not know that you are putting a constraint for the next designer that comes along.
For instance, as the assignment progressed, I was not quick to propose interior design options which had serious effects on the exterior look of the building because the exterior impressions had been completed and agreed on between client and architect prior to my involvement in the project. I found that in some cases, a room needed more lighting, or a window would do better in a different position but such seemingly minimal changes, while enhancing the interior of that particular room, required more changes to be made to other rooms so as not to distort the wholesomeness of the total external image.
-
Limiting the number of changes to the design – Beware of clients who are very undecided about the final product from any assignment. Some clients tend to make changes every now and then, turning your assignment into a nightmare of sorts. It is a good idea to limit the number of iterations to a design. Beyond the agreed number of iterations, the client should be required to pay for any additional iteration. This should instill some discipline on the part of the client.
-
The client’s interests versus the interior designers – Unlike the interior designs for large commercial and mixed-use buildings, clients with interior design assignments for residential property are usually more particular about certain things that they want. You should have the discipline to appreciate that the client has an opinion and his or her own taste. Especially with residential projects, you may be better off compromising on what you think looks good and work at making their ideas work. In the same way, you need to appreciate that this is not your own personal project and you should not get too attached to it. However, as hinted on before, the mere fact that you have been hired by a client means that they value your opinion, knowledge, creativity and professional advice, and you should amply supply it.
-
The beauty of 3D imaging – For the client to appreciate your output in this kind of work, they need to see the finished product. The problem with this is that they can get carried away and keep on proposing new things even beyond the scope of your assignment and yet it takes a lot of desk work to make even what seem like minor modifications, not to mention the hours required to produce good quality images or walk-through videos.
- Beware, there is a lot of work ahead – At the start of the assignment, I got engrossed in design without considering the implications it would have on the final design documentation. I think this is partly a good thing and partly a bad thing. Not being able to estimate at the beginning how much work you will be required to do will cause serious errors in estimating how much you should charge the client and in setting timelines for project deliverables, but being overly sensitive about the volume of design drawings you may have to produce later may make you hold back in design.
Conclusion
The client has since built his house; making further modifications along the way with my consultation. I am available for any future interior design assignments. Potential clients can reach me through thebuildersgarage@gmail com.
©. The Builders’ Garage 2017. Permission to use this article or quotations from it is granted subject to appropriate credit being given to thebuildersgarage.com as the source.
Follow The Builders’ Garage on Facebook , like our page to receive updates and leave us a comment
Follow (connect with) the writer (Cyrus Titus Aomu) on LinkedIn